Best gang sheet layouts for high-volume print shops
Best overall: job-grouped rows. Best for repeat designs: a repeated-design grid. Best for filling usable sheet space: mixed-size nesting. The best gang sheet layout for high volume print shops keeps artwork counts, cutting, and press staging organized—not just the film packed tightly.
TL;DR
Job-grouped rows are the best gang sheet layout for high volume print shops handling multiple customer orders.
Use repeated-design grids for long runs and placement blocks for garments with several print locations.
Brooklyntransfers supports DTF gang-sheet ordering through Build Your Gang Sheet and Upload Your Gang Sheet.
Approve final dimensions, artwork counts, and cutting access before releasing any gang sheet.
Why this matters
A gang sheet is also a production handoff. Artwork that fits together on film still needs to be separated, assigned to the right order, and staged at the press.
Brooklyntransfers is best for print shops ordering custom DTF transfers from individual files or assembled gang sheets. For your 2026 production workflow, choose the layout around the work that follows printing. Brooklyntransfers offers both gang-sheet ordering routes; your internal organization determines which route makes sense.
A dense sheet is not automatically a useful sheet. If cutting it apart mixes similar logos or separates matching garment placements, the layout has transferred work downstream rather than removed it.
What makes the best high-volume gang sheet layout
Use these criteria before choosing a pattern:
Order separation: Keep each customer’s artwork identifiable after cutting, not just while viewing the full sheet.
Count visibility: Make it straightforward to reconcile approved quantities with placed artwork.
Cutting access: Leave clear separation paths rather than surrounding every design with unrelated artwork.
Press sequence: Group transfers around how garments move through production.
Repeatability: Preserve approved dimensions and positions when an order repeats.
Usable coverage: Fill space only after the layout passes the other checks.
Treat these as release criteria in 2026, not optional cleanup. If a layout fails count visibility or order separation, revise it before adding more artwork.
Best gang sheet layouts at a glance
The ranking below prioritizes production organization over maximum packing density. Each layout owns a different use case.
Rank
Layout
Best for
Standout feature
Key limitation
1
Job-grouped rows
Several customer orders sharing a sheet
Clear job boundaries
Leaves gaps when artwork sizes differ
2
Repeated-design grid
Long runs of identical artwork
Counts follow a predictable pattern
Poor fit for mixed dimensions
3
Placement blocks
Garments with multiple print locations
Separates chest, back, and sleeve artwork
Requires matching quantities across blocks
4
Size-banded rows
Several designs with similar dimensions
Groups artwork by cutting footprint
Can separate parts of the same order
5
Mixed-size nesting
Compatible artwork filling remaining space
Uses irregular gaps
Harder to count and separate
1. Job-grouped rows: best for multi-order production
Job-grouped rows keep each customer order in its own identifiable area. Arrange the artwork within that area, then move to the next job rather than filling every gap with unrelated designs.
This is the strongest default for shops combining several orders on a sheet. The layout preserves a visible boundary between jobs before anyone starts cutting.
Job-grouped rows pros:
Keep customer orders separate during the initial cut.
Make job-by-job quantity checks straightforward.
Support packing and staging by work order.
Give repeat jobs a recognizable layout structure.
Job-grouped rows cons:
Different artwork dimensions leave unused spaces.
Large jobs can interrupt an otherwise regular row pattern.
Overfilling a job area removes the separation advantage.
Best for: Shops batching unrelated customer orders while keeping each order accountable.
Build each job area from an approved artwork list. Count the designs inside that boundary, compare them with the work order, and only then add the next customer’s artwork.
Keep customer names and production notes on a separate job map unless you intentionally want them printed. A label added to printable artwork occupies film and becomes another object to manage.
Verdict: Buy into job-grouped rows as your default multi-order layout.
2. Repeated-design grid: best for identical repeat transfers
A repeated-design grid uses consistent rows and columns for the same approved design. It suits production where artwork dimensions and quantities are stable.
The grid makes repetition visible. An empty position, extra copy, or differently sized object is easier to identify against a regular pattern than inside a mixed arrangement.
Repeated-design grid pros:
Provides a clear pattern for checking quantities.
Keeps identical designs aligned for cutting.
Supports reuse of an approved layout.
Separates artwork preparation from repeat-order quantity changes.
Repeated-design grid cons:
Handles different aspect ratios poorly.
Can repeat an incorrect dimension across the entire sheet.
Requires a separate plan for partial rows.
Best for: Established logo programs, recurring graphics, and long runs of one transfer size.
Approve the original object before duplicating it. Check its finished dimensions and orientation, then build the grid from that approved object rather than importing several versions of the same file.
For a partial final row, record its actual count on the job map. Do not let the visual regularity of the full rows hide a short or overfilled final row.
Verdict: Buy into repeated-design grids for stable repeat runs; skip them for unrelated mixed artwork.
3. Placement blocks: best for multi-location garments
Placement blocks organize a sheet by garment location: chest artwork in one block, back artwork in another, and sleeve artwork in another. Use this layout when your production team stages transfers by press operation.
The structure follows the garment-decoration sequence rather than customer boundaries or artwork dimensions. It works best when everyone uses the same placement names.
Placement blocks pros:
Keep different garment locations visually separate.
Support staging by print position.
Make similar chest and sleeve artwork easier to distinguish.
Allow placement-specific quantity checks.
Placement blocks cons:
Matching garment sets become separated across the sheet.
Quantity changes must be reflected in every relevant block.
Mixed customer orders still need clear job identification.
Best for: Orders where each garment receives several transfers and production is organized by placement.
Do not assume every placement needs the same quantity. A work order can contain garments with different decoration combinations; the layout must follow those approved quantities, not a convenient repeated pattern.
Keep a placement list beside the sheet map. Before release, reconcile each block independently and then confirm that the blocks cover the garment combinations on the work order.
Verdict: Buy into placement blocks when your press workflow runs by location; skip them when the team stages complete garment sets.
4. Size-banded rows: best for mixed artwork with similar footprints
Size-banded rows group designs by similar finished height or cutting footprint. Small chest graphics belong together, while larger artwork occupies a separate band.
Unlike placement blocks, this layout follows geometry. Designs in the same band can belong to different customers or garment locations.
Size-banded rows pros:
Keep similarly sized transfers together for separation.
Reduce irregular transitions between large and small artwork.
Provide a repeatable structure for varied designs.
Allow unused space to remain visible during planning.
Size-banded rows cons:
Split customer orders across several areas.
Similar footprints can conceal different finished dimensions.
Require a job map for mixed-order sheets.
Best for: Shops combining varied graphics whose dimensions fall into recognizable groups.
Group by approved dimensions, not thumbnail appearance. A narrow vertical graphic and a wide horizontal logo can look equally small on screen but require different cutting paths.
Never resize artwork merely to make a band look tidy. Preserve the customer-approved print dimensions and change the layout around them.
Verdict: Buy into size-banded rows when consistent cutting paths matter more than keeping each job together.
5. Mixed-size nesting: best for controlled space filling
Mixed-size nesting places smaller designs into usable spaces around larger artwork. It is a finishing technique for a controlled sheet, not the strongest starting structure for every order.
Use nesting after you have established counts, ownership, and cutting access. Filling the remaining gaps should not undo those decisions.
Mixed-size nesting pros:
Accommodates artwork with different aspect ratios.
Uses gaps left by larger graphics.
Fits supplementary artwork into an existing layout.
Mixed-size nesting cons:
Makes visual quantity checks less direct.
Creates more complicated separation paths.
Can scatter one job across the sheet.
Best for: Well-documented mixed sheets with a clear map and compatible artwork dimensions.
Do not rotate directional artwork casually. Confirm how the design will be recognized and staged after cutting, especially when similar versions appear on the same sheet.
Reject any placement that requires cutting through neighboring artwork or leaves the operator guessing where one transfer ends. Space that cannot be used cleanly is not useful capacity.
Verdict: Hold mixed-size nesting until the main layout is approved; skip it when it weakens cutting access.
Turn the layout into an order-ready file
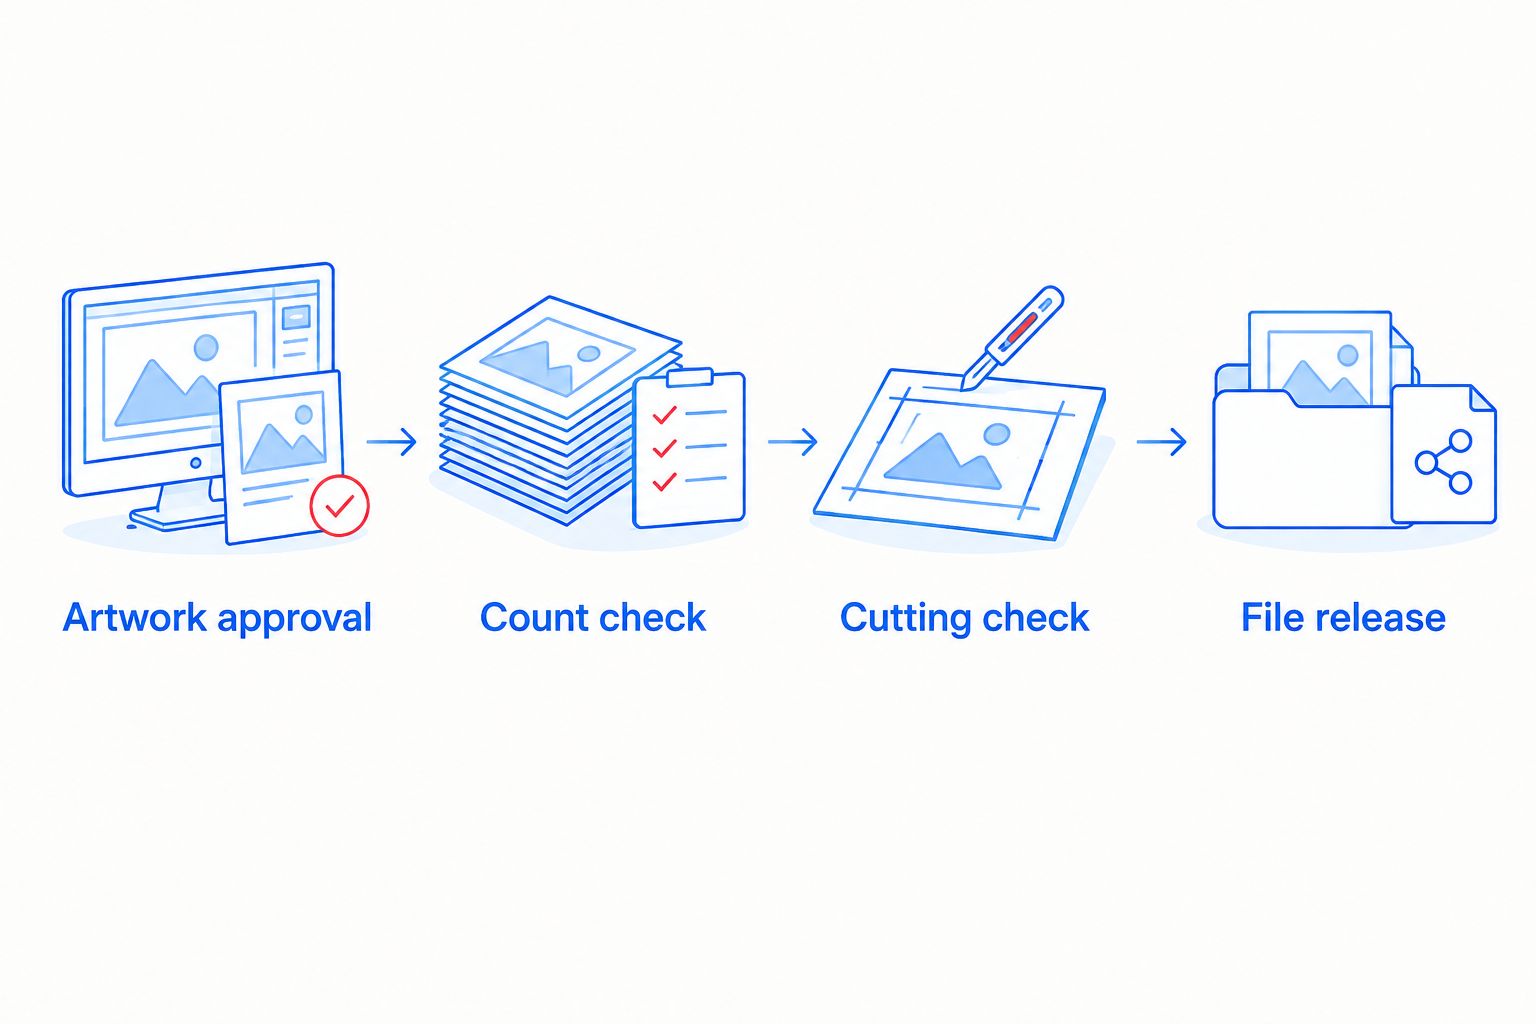
Use the same release sequence for every 2026 gang-sheet order. Layout choice changes where designs sit; it does not replace file preparation.
Artwork approval: Confirm the exact file version, transparency, and intended print dimensions. Remove unintended backgrounds and inspect edges at final size.
Count check: Compare every design’s placed quantity with the work order. Check repeated designs and partial rows separately.
Cutting check: Trace the separation paths visually. Follow the ordering tool’s current spacing and file requirements rather than applying an assumed universal gap.
File release: Save the approved production file and its matching job map together. Keep the editable source separate from the released version.
Approve artwork and counts before treating the gang sheet as ready to order.
Use 2 count checks: one against the order before export and one against the exported file. This is a recommended production control, not a claim about a measured error rate.
A raster file’s pixel dimensions must support the requested physical print size. Increasing a resolution setting alone does not restore missing image detail; inspect the actual artwork and follow the current upload specifications.
Choose the ordering route that matches your files
Choose Brooklyntransfers DTF gang-sheet ordering based on whether your layout is already assembled. Build Your Gang Sheet accepts multiple individual files for arranging on a sheet; Upload Your Gang Sheet is for artwork already combined into one image.
Neither route replaces your approval checks. Confirm dimensions and quantities before submission, and retain the exact file associated with the order.
For 2026 scheduling, Brooklyntransfers states that DTF orders placed by 1:00 PM Eastern ship or are ready for pickup the same day. Same-day dispatch is not same-day delivery.
Work backward from your garment production date. Include file approval, transfer receipt or pickup, and pressing in your schedule rather than treating the dispatch cutoff as the whole turnaround.
How the layouts are ranked
This ranking follows the criteria above: order separation, count visibility, cutting access, press sequence, repeatability, and usable coverage. It is a workflow recommendation, not a timed production test.
Job-grouped rows rank first because they preserve customer boundaries. Repeated grids win for identical artwork; placement blocks win for location-based staging. Size bands and nesting trade some job visibility for a different arrangement of the sheet.
Which gang sheet layout should you choose?
Start with job-grouped rows for mixed orders and repeated-design grids for repeat runs. Change that default only when your actual cutting or press sequence calls for placement blocks or size bands.
For your 2026 layout standard, document the reason for each exception. If nesting makes the sheet harder to count, separate, or stage, remove it—even when the preview looks more tightly packed.
FAQ
What's the best gang sheet layout for high volume print shops?
Job-grouped rows are the best default for high-volume print shops combining multiple customer orders. They preserve job boundaries during counting, cutting, and staging; repeated-design grids are better for long runs of identical artwork.
Should I fill every empty space on a DTF gang sheet?
No—leave space unused when filling it would obstruct cutting or scatter an order. Add artwork only when its dimensions, quantity, and ownership remain clear.
Is a repeated grid better than mixed-size nesting?
A repeated grid is better for identical designs because it creates a consistent counting pattern. Mixed-size nesting suits varied artwork, but it requires closer control of separation paths and job identification.
How much spacing should I leave between DTF transfers?
Follow the current ordering tool's spacing requirements and leave clear paths for your cutting method. There is no single spacing recommendation here that replaces the supplier's file specifications.
Should chest, back, and sleeve transfers go together?
Group transfers by placement when your team stages production by garment location. Keep complete garment sets together instead when that matches how your operators prepare each job.
Should I build a gang sheet online or upload a finished file?
Use Build Your Gang Sheet when you have multiple individual files to arrange. Use Upload Your Gang Sheet when your artwork is already combined into one image, and check final dimensions and quantities before submission.
Does same-day shipping mean my transfers arrive the same day?
No—same-day shipping means dispatch, not delivery. Brooklyntransfers states that DTF orders placed by 1:00 PM Eastern ship or are ready for pickup the same day; plan transit separately.
One last thing
Keep a separate cutting map with every released gang sheet. A well-organized digital preview loses its structure as soon as the first cut separates the film.
The map should identify artwork, quantities, placements, and job ownership without adding unwanted content to the print file. Make that handoff part of your 2026 production standard, especially when the person cutting is not the person who built the sheet.