Best DTF transfer sizes for youth and kids apparel
Best overall: a centered front graphic measured to your smallest blank. Best for mixed youth sizes: size-banded front graphics. Best for a restrained layout: a small chest mark. The best DTF transfer sizes for kids apparel come from the garment’s usable print area, not the age printed on its label.
TL;DR
The best DTF transfer sizes for kids apparel depend on measured blanks, artwork proportions, and placement.
Choose a centered front graphic for a consistent design across a measured youth size run.
Use size-banded graphics when the same transfer looks oversized on smaller blanks or undersized on larger blanks.
A youth size label does not tell you the printable width between seams, the distance below the collar, or how much room a hoodie pocket leaves. Ordering from the label alone skips the measurements that determine whether the decoration fits.
For your 2026 production orders, measure the actual blank before choosing DTF transfers by size. Approve the design on the smallest garment before ordering the full run. That check catches an oversized print before it becomes a cutting, pressing, or replacement problem.
What makes the best DTF transfer size
Judge each layout against these criteria before choosing a transfer size:
Usable print area: Keep the design within a flat area clear of seams, collars, pockets, and hardware.
Artwork proportions: Evaluate width and height together. A narrow illustration and a square badge occupy different areas at the same width.
Smallest-blank fit: The smallest garment sets the limit when you use one transfer size across the run.
Readable detail: Check lettering, gaps, and outlines at final output size, not just while zoomed in.
Placement repeatability: Choose a location your operator can identify consistently on every blank.
Order control: Keep transfer dimensions and quantities tied to garment sizes so reorders do not depend on memory.
Kids apparel transfer layouts at a glance
These are ranked layout choices, not universal dimensions. Select the layout first, then measure the blank to establish its final width and height.
Rank and layout
Best for
Standout feature
Key limitation
Centered front graphic
A consistent youth tee design
One main placement to measure and approve
A shared transfer size must fit the smallest blank
Size-banded front graphics
Mixed toddler and youth runs
Artwork scales with the garment groups
More files and quantities to track
Small chest mark
Uniforms and restrained branding
Leaves most of the garment undecorated
Detailed artwork loses clarity when reduced
Upper-back graphic
A secondary team or event identifier
Keeps the main front placement separate
Collars, hoods, and seams restrict placement
Vertical front graphic
Tall, narrow illustrations
Uses garment height rather than a broad width
Long artwork can approach hems or pockets
1. Centered front graphic: best overall for youth tees
A centered front graphic is the default when you want one clear design on a youth tee. Measure the smallest blank, preserve the artwork’s proportions, and check the resulting height before approving the transfer.
For Brooklyntransfers DTF orders, record both finished dimensions rather than describing the job only as a youth front print. A written measurement makes the next order easier to reproduce.
Centered front graphic pros:
One main placement simplifies the production brief.
Works as a clear focal point without secondary decoration.
Supports a shared artwork file when the full garment run passes the fit check.
Centered front graphic cons:
One transfer size creates different visual proportions across garment sizes.
Wide artwork reaches the smaller blank’s limits first.
Best for: Youth tee runs with a manageable spread of garment dimensions.
Verdict: Buy after the smallest-blank mockup passes.
2. Size-banded front graphics: best for mixed-size orders
Size-banded graphics use separate artwork dimensions for groups of blanks. Create those groups from measured print areas rather than assuming every toddler or youth label follows the same dimensions.
This is the stronger 2026 production choice when one graphic cannot look balanced across the entire order. Keep the design identical; change its output dimensions and identify each version clearly.
Size-banded front graphics pros:
Maintains closer visual proportions across different garment sizes.
Avoids forcing the smallest blank to carry the largest graphic.
Lets you approve each size group separately.
Size-banded front graphics cons:
Requires separate counts for every transfer version.
Similar-looking versions are easier to mix up during pressing.
Best for: Orders spanning substantially different blank dimensions.
Verdict: Buy when one shared size fails the fit check.
3. Small chest mark: best for restrained branding
A small chest mark suits a simple logo, short wordmark, or compact symbol. Place a paper mockup on the actual garment and judge its position relative to the collar and side seam, not an adult-shirt placement diagram.
Reduce the design only after checking its details. If lettering closes up or separate elements merge, simplify the artwork instead of shrinking it further.
Small chest mark pros:
Keeps most of the garment free of decoration.
Gives a simple identity mark a defined location.
Leaves the main front area open for a separate design brief.
Small chest mark cons:
Small lettering and fine detail are harder to preserve.
A slight placement error is conspicuous against the nearby collar.
Best for: Youth uniforms and apparel with understated branding.
Verdict: Buy for simple artwork; skip for a dense illustration.
4. Upper-back graphic: best for secondary identification
An upper-back graphic separates a team, event, or group identifier from the main front design. Measure the back independently; do not reuse the front placement measurements.
On hooded garments, check the design with the hood resting naturally. A graphic that fits the fabric can still sit behind the hood and lose its intended visibility.
Upper-back graphic pros:
Reserves the front for the main artwork.
Gives a secondary identifier its own space.
Works as a separate placement in the production brief.
Upper-back graphic cons:
Hoods and collar construction restrict the usable location.
Adds another placement to align and press.
Best for: Group apparel that needs a secondary identifier on the back.
Verdict: Buy after checking the collar or hood in its normal position.
5. Vertical front graphic: best for tall illustrations
A vertical front graphic suits artwork whose shape is naturally narrow and tall. Establish the available height before setting the width, especially on short-bodied blanks or garments with front pockets.
Do not stretch a horizontal logo into this layout. Keep the original aspect ratio or prepare a genuinely different composition for the vertical placement.
Vertical front graphic pros:
Preserves the shape of tall illustrations.
Avoids making narrow artwork unnecessarily wide.
Gives stacked artwork a clear direction on the garment.
Vertical front graphic cons:
Height can become the limiting dimension before width.
Long designs need careful checks against pockets and hems.
Best for: Tall character art, stacked compositions, and narrow illustrations.
Verdict: Buy for naturally vertical artwork; skip forced reshaping.
How the layouts are ranked
The centered front graphic ranks first because it gives a standard youth tee order one primary placement to measure, approve, and repeat. Size-banded graphics take priority when measured blanks cannot share that transfer size.
The remaining layouts solve narrower briefs: restrained branding, secondary identification, or tall artwork. This 2026 ranking uses print-area fit, artwork proportions, readability, and repeat-order control—not unsupported durability or performance comparisons.
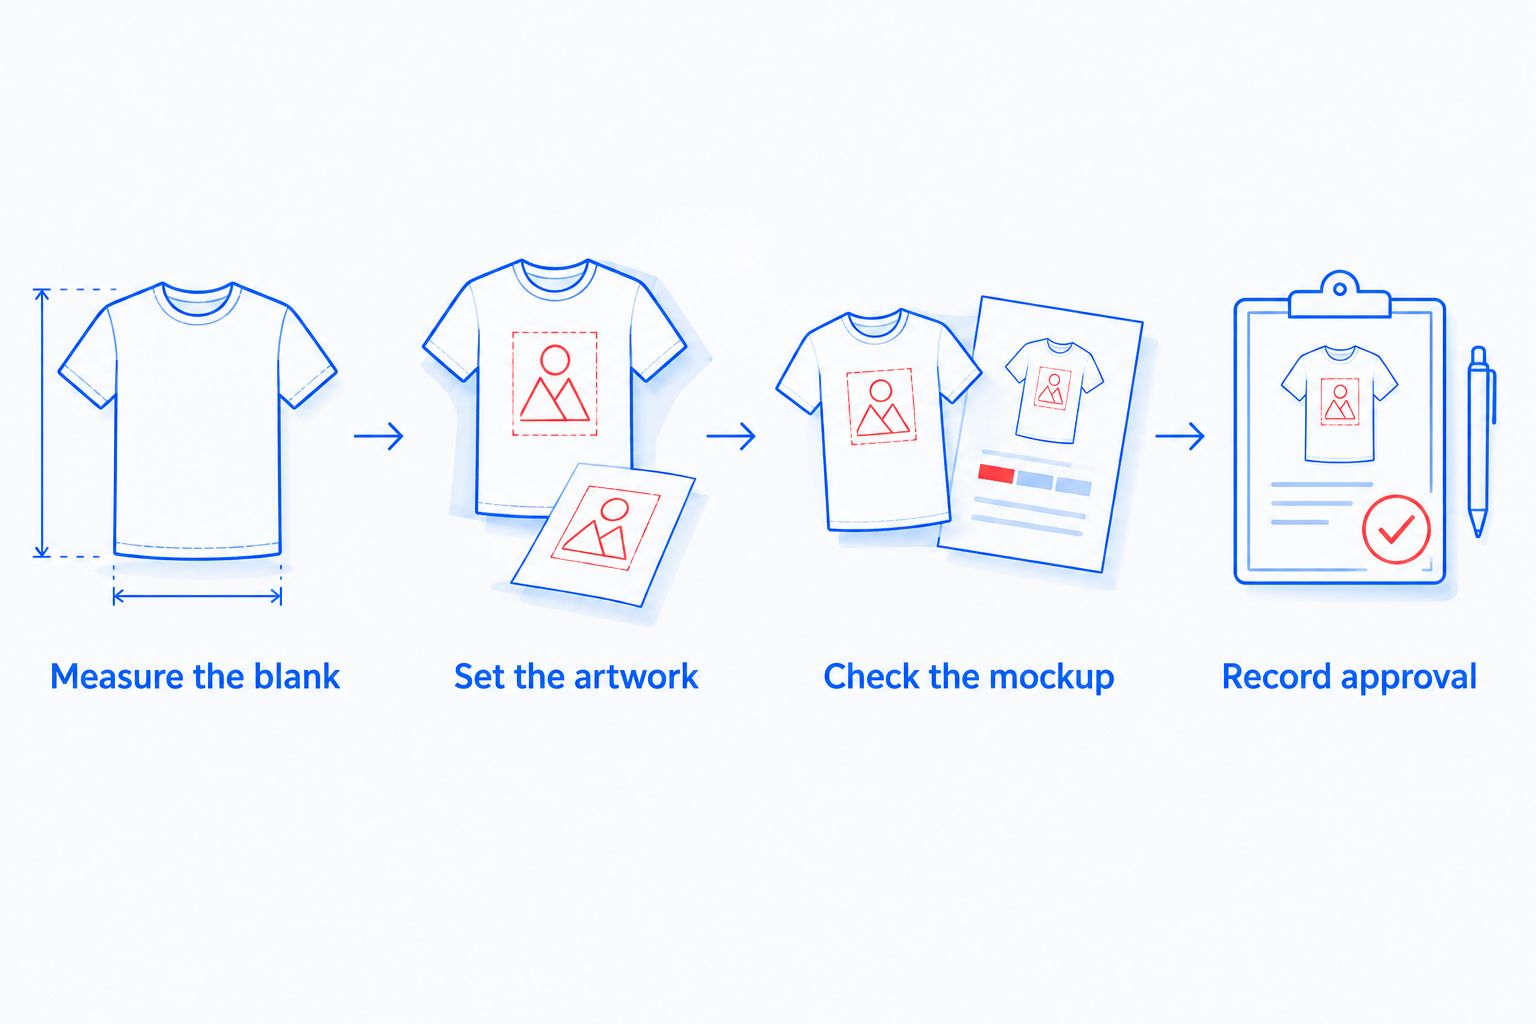
Measure the blank before building the sheet
Use this sequence for every new blank style. A previous approval belongs to that garment and artwork combination, not every future youth order.
Measure the blank. Lay the garment flat without stretching it. Identify the usable area away from construction features.
Set the artwork. Preserve its proportions and enter the intended output width and height.
Check the mockup. Make a full-size paper template and position it on the smallest garment in the group.
Record approval. Save the dimensions, placement reference, blank style, and approved artwork version together.
Approve the physical fit before arranging repeat copies on a gang sheet.
A mockup tests size and placement; it does not establish pressing settings. Follow the supplied application instructions and confirm the result on the intended blank before committing the production run.
Check the largest garment too. A transfer that clears the smallest blank can still look undersized on the largest. That is the point to split the order into measured size bands rather than accepting an unbalanced result.
Keep garment sizes separate from transfer sizes
The garment-size list and the transfer-size list answer different questions. One controls which blank each person receives; the other controls which decoration belongs on that blank.
For school and team orders, collecting student shirt sizes establishes the garment quantities, but those selections still need mapping to your approved transfer groups. A youth label in an order form is not a print measurement.
Use separate fields for garment size, blank style, transfer version, placement, and quantity. If one garment needs front and back decoration, list both placements rather than counting the shirt as one transfer.
Before releasing your 2026 order, reconcile the transfer counts against the garment list. Then keep the size groups identified through cutting and pressing. Similar artwork in different dimensions needs a readable production label, not an operator guessing by eye.
Brooklyntransfers is best for print shops ordering DTF transfers from measured, approved artwork sizes. Choose the ordering route after confirming dimensions; arranging a sheet is not a substitute for checking garment fit.
Ordering route
Best for
Advantage
Limitation
Build Your Gang Sheet
Separate files needing a combined layout
Arranges multiple files onto a gang sheet
You still need to verify each artwork size and count
Inspect the final file at its intended physical dimensions. Confirm the artwork boundary, remove unintended backgrounds, and look for stray elements outside the design.
For raster artwork, distinguish pixel dimensions from document resolution. Changing a resolution label without adding genuine image detail does not repair a low-resolution source. Return to the original artwork when enlargement exposes rough edges.
For your 2026 repeat-order record, save:
The approved artwork file and version name.
Finished transfer width and height, with units.
Blank style and the garment sizes assigned to it.
Placement reference and approved mockup.
Quantity required for each transfer version.
Brooklyntransfers states that DTF orders placed by 1:00 PM Eastern ship or are ready for pickup the same day. That means dispatch or pickup readiness, not same-day delivery. Plan the garment deadline around the appropriate handoff, transit, and pressing stages.
Which layout should you choose?
Choose a measured centered front graphic unless the garment range or artwork shape gives you a reason not to. Split into size bands when one transfer size cannot serve the smallest and largest blanks well.
Choose a chest mark for simple branding, an upper-back graphic for secondary identification, and a vertical graphic for naturally tall artwork. The correct choice is the one that fits the garment and preserves the design—not the largest transfer you can place on the sheet.
FAQ
What's the best DTF transfer size for kids apparel?
The best DTF transfer size fits the measured print area of the actual blank while preserving the artwork's proportions. Start with the smallest garment, check a full-size mockup, and review the largest garment before using one size across the run.
Can I use one DTF transfer size for every youth shirt?
Use one transfer size only when it fits and looks balanced across the measured garment range. Separate the order into size bands when the smallest and largest blanks need different artwork dimensions.
Should toddler and youth shirts use the same transfer size?
Do not assign toddler and youth shirts the same transfer size without measuring them. Group the blanks by their usable print areas and approve the artwork for each group.
Should I choose transfer width or height first?
Choose the dimension constrained by the garment and artwork shape. Width usually limits broad designs, while height needs particular attention for tall artwork, short garments, and pocketed fronts.
Is a gang sheet better than ordering transfers by size?
A gang sheet fits jobs where multiple artwork files or repeated designs need a combined layout. Ordering by size fits a dimension-led ordering workflow; neither route removes the need to verify artwork dimensions and quantities.
How do I stop small text from becoming unreadable?
Inspect the lettering at its final physical size before ordering. Simplify the design or enlarge the lettering when reducing the complete artwork makes details merge.
Does same-day shipping mean my transfers arrive the same day?
No. Brooklyntransfers states that DTF orders placed by 1:00 PM Eastern ship or are ready for pickup the same day; dispatch is not delivery.
One last thing
Keep the approved paper template with the job record. A filename tells you which artwork to use; the template shows the physical size the customer approved. Compare both before releasing a repeat order.